Security Role
In order to use Dynamic QuickSales, each user needs to have the Dynamic QuickSales User security role.
Login to the system as the system administrator and then to Settings, Security and select Users.
Select the user you wish to give access to and click on Manage Roles from the upper menu.
From the list of Security Roles, select Dynamic QuickSales User and click Ok.

Solution Configuration
We describe in this section how to configure the settings you need within the solution.
Please go to Settings, Solutions and select Dynamic QuickSales solution.
Go to Configuration, and on the right-hand window select Configuration.
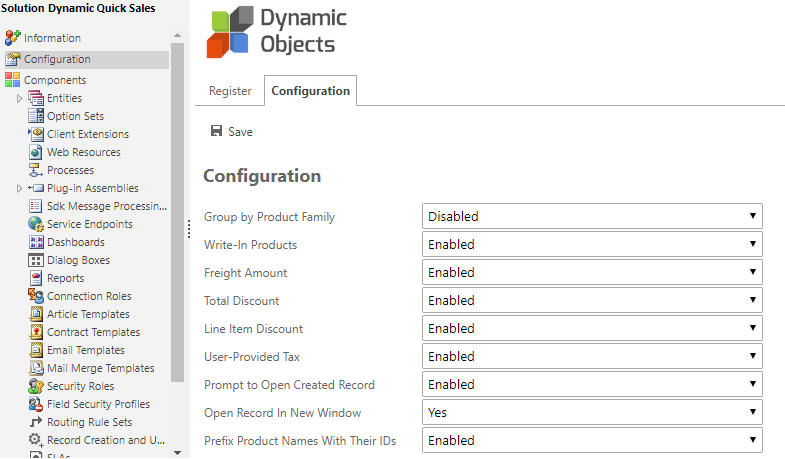
From the list of settings shown, enable and disable the settings you need in the solution and then click Save.
N.B: All Settings are set to enabled by default in case the solution is not configured.
| Configuration | Description |
| Group by Product Family | Enabled Displays the product family field in Dynamic QuickSales allowing users to filter product by Product Family. Disabled Disables feature and does not display Product Families in Dynamic QuickSales. |
| Write-in Products | Enabled Allows users to add write-in Products in Dynamic QuickSales. Disabled Disables feature and does not Allow users to add write-in Products in Dynamic QuickSales. |
| Freight Amount | Enabled Enables the Freight Amount field in Dynamic QuickSales. Disabled Disables the Freight Amount field in Dynamic QuickSales. |
| Total Discount | Enabled Enables the Total Discount field in Dynamic QuickSales. Disabled Disables the Total Discount field in Dynamic QuickSales. |
| Line Item Discount | Enabled Enables the line Item Discount field in Dynamic QuickSales. Disabled Disables the line Item Discount field in Dynamic QuickSales. |
| User-Provided Tax | Enabled Enables the line Item Tax field in Dynamic QuickSales. Disabled Disables the line Item Tax field in Dynamic QuickSales. |
| Prompt to Open Create Record | Enabled Prompts the user to open the newly created record in Dynamic QuickSales. Disabled Disables the prompt for the user after creating a record in Dynamic QuickSales. |
| Open Record in New Window | Enabled Opens the newly created record in a new browser window in Dynamic QuickSales. Disabled Opens the newly created record in the same window in Dynamic QuickSales. N.B: This feature is always set to disabled in the Microsoft Dynamics 365 mobile application. |
| Prefix Product Names with their IDs | Enabled Concatenates the product ID with the Product Name and displays it in the Product field in Dynamic QuickSales. Disabled Displays the product Name as is in Dynamic QuickSales. |
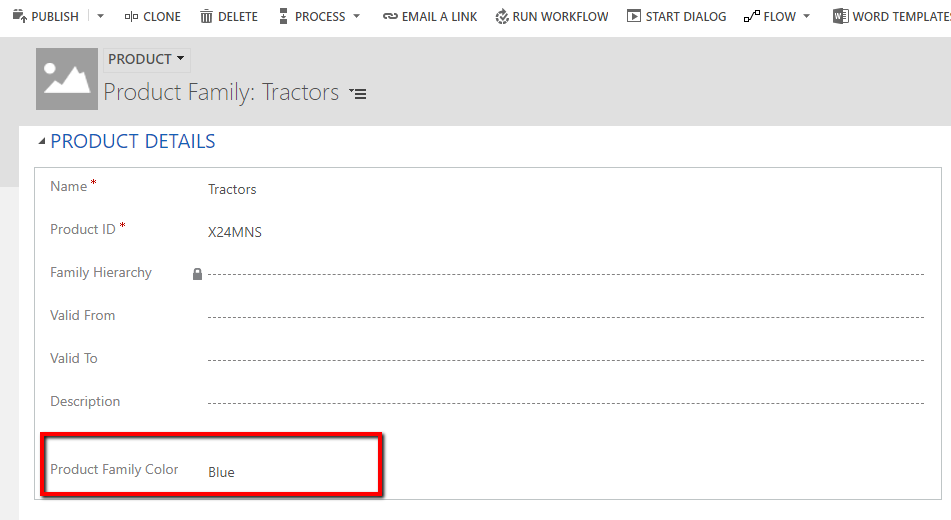
Color Coding Product Families
Should you choose to enable color coding in the solution, you need to add the "Product Family Color" Option set to the product entity form. Please make sure to save and publish the form for the changes to take effect.
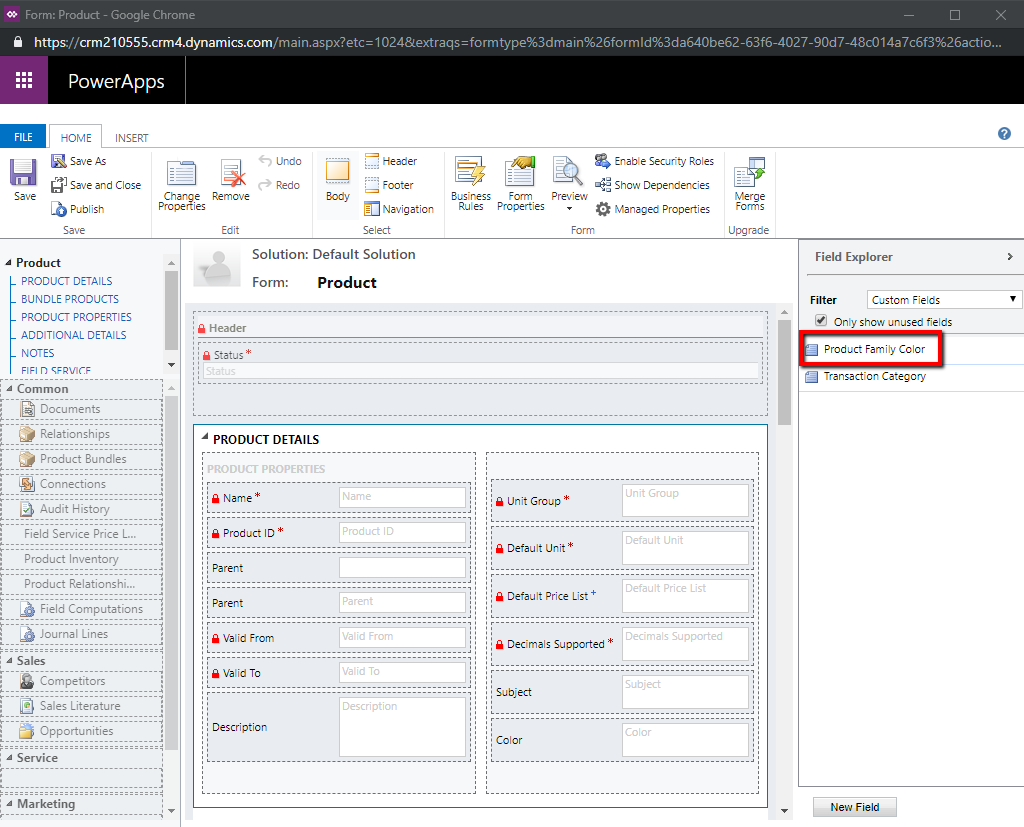
Once the above step is complete, please go to the respective product family and choose the color you need from the option set.
There are 38 options already listed for use. In case you need to add additional values please make sure the html name added to the option set follows the X11 color naming standards. You can check a multitude of options here (refer to the "X11 color names" section).
Enable for Mobile
In order to use the solution with the Microsoft Dynamics 365 mobile application, you need make sure that the "enable for mobile" field for the Dynamic QuickSales web resource is set on the Account and Contact Forms. Please make sure to save the form and publish for the changes to take effect.
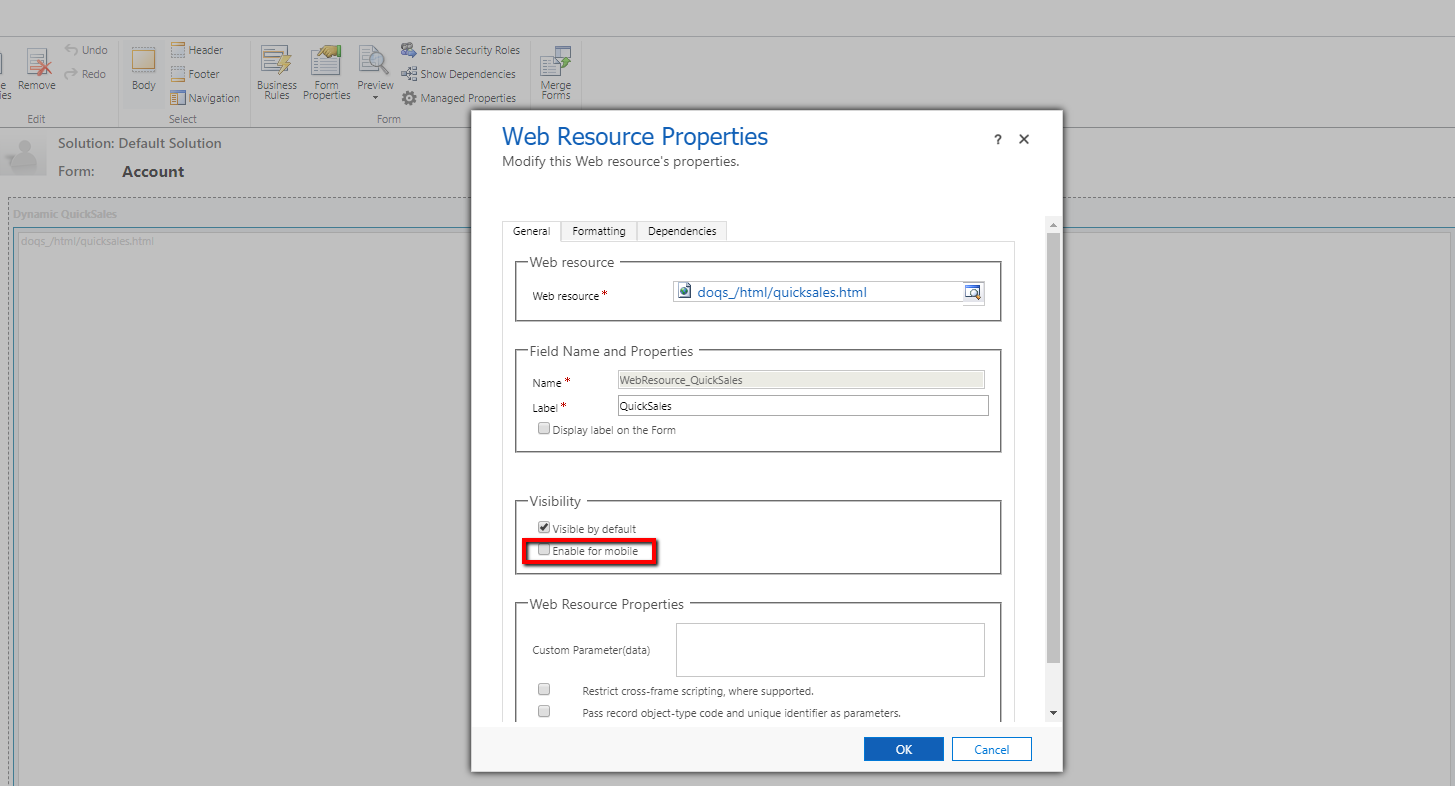
Once set, users will be able to use Dynamic QuickSales on the Microsoft Dynamics 365 mobile application.
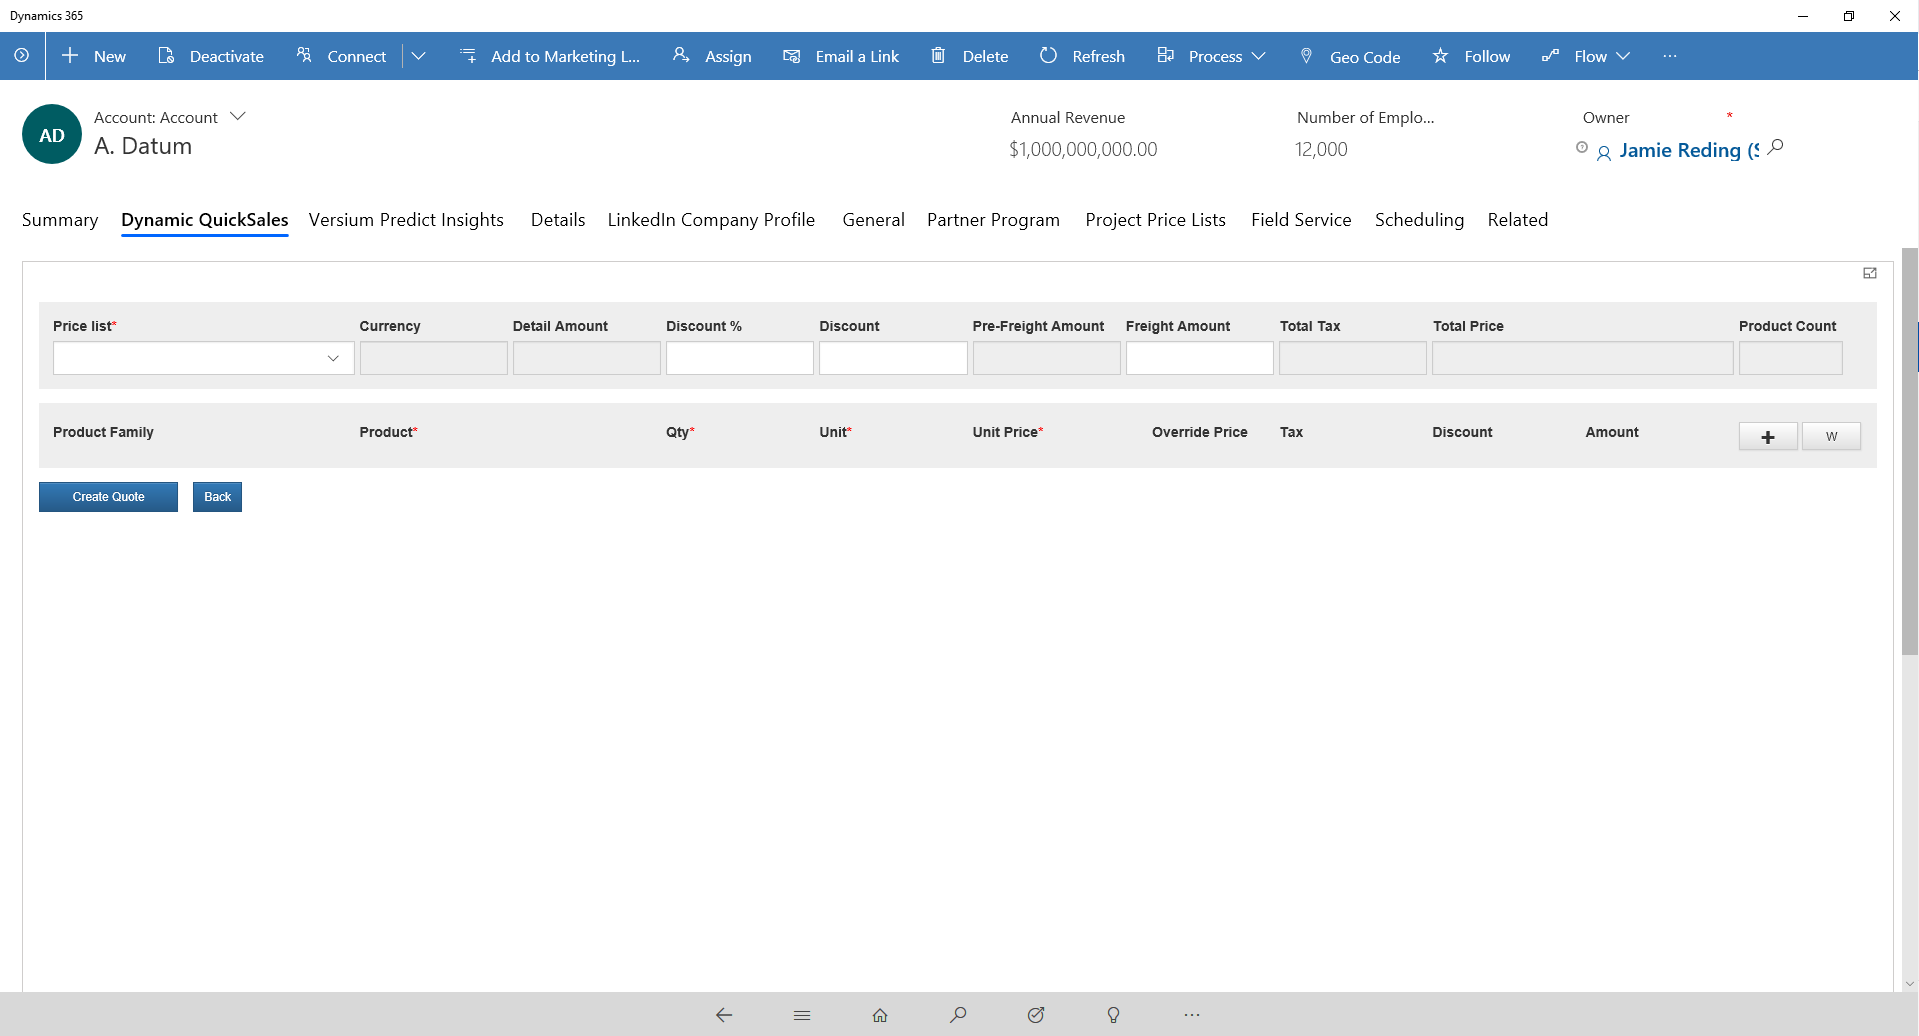
Create a Sales Record
We describe in this section how to create a sales record using Dynamic QuickSales.
You can create an Sales record for a Contact or an Account. In both options, please open the record in question and locate the Dynamic QuickSales tab and click on the related Sales Record button.

You can use the Back button to go back to the main menu and choose another option such as Create Opportunity, Create Quote, Create Order or Create Invoice.
Start by selecting Price List, once selected, a new Sales Record Product line is displayed.

If you added the option to have the Parent Products Hierarchy, you can start by selecting the Family Product under Product Family and then choose the product from the family under the Product column. You can also start by choosing the Product from the list displayed grouped by Product Family.
Once a Product is selected, the Product Family, Unit and Qty are filled along with the Unit Price and Amount.
Update the quantity (Qty) and select a different Unit if needed.

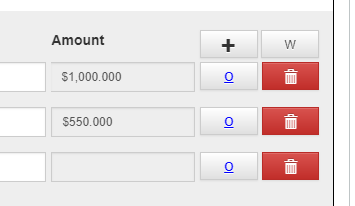
Color-coding is used in the solution to make it easier for users to differentiate the products and discounts applied. The following color-coding rules are applied and shown in the example below:
- Each Family is represented with a different color (you need to select a color in the "Product Family color" field in the product entity)
- Blank Product Families are colored in Black.
- Kit products are colored in violet at the product level.
- A Red bar on the left-hand side of the Amount is displayed when a Volume Discount is applied.

Add a new Sales Record Product by clicking the + sign on the upper right-hand side of the table, or click the W button to add a new write-in product.
Open the price list item using the O and delete the Sales Record Product by clicking the red bin button.
Tick the Override Price, to change the Unit Price of the Product.
You can provide Tax for each product as you see fit or leave it empty if no taxation is to be applied.
Note: In case the Dynamic VAT solution is deployed on the organization and it is needed, Please set the User Provided Tax option as disabled in the solution configuration.
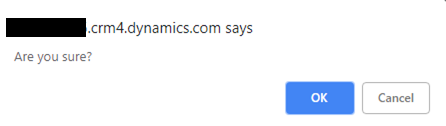
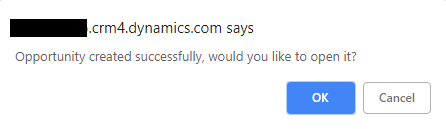
To create the sales record, click the button Create button; the system will display a confirmation message for you and you can proceed with the creation of the opportunity or go back and update the products selected.
If Prompt to Open Created Record option in configuration has been enabled, a second confirmation message is displayed for you to either open the new record or not.
If Yes is selected for the option Open Record in New Window in the configuration, the newly created record will open in a new window.